In Curiosities of the Sky, a 1909 astronomy book, Garrett Serviss wrote that the spectrum of [spiral nebulae like M51] resembled that of a "flock of stars so distant that they are separately indistinguishable...just as the component stars of the Milky Way are indistinguishable with the naked eye." Could it be that these spiral nebulae are, in fact, entirely separate galaxies outside of the Milky Way? Serviss didn't think so: "...this idea is unacceptable if for no other reason than that, as just said, all the spiral nebulae possess the same kind of spectrum and no one would regard them all as outer universes [galaxies]."
Today we know that M51 is just one of hundreds of billions of "outer universes", each one containing billions of stars. I find it hard to comprehend that fact on any but the most abstract, intellectual level. It is no surprise that astronomers of Serviss's time had trouble with the idea.
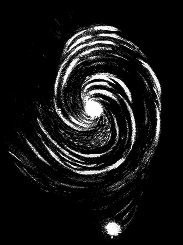 |
| Figure 1: Sketch of M51 by the Earl of Rosse using a 72-inch telescope. |
In 1845, the Earl of Rosse first saw the mysterious spiral structure of M51, using a 72-inch reflector, then the world's largest telescope. Today, it is difficult, but not impossible, to see the spiral structure with modest amateur instruments. From under the light-pollution of Cambridge, I have never been able to see any structure at all in M51. Fortunately, a CCD camera can integrate hours worth of light and easily reveal the structure that used to require a telescope the size of a barn to see.
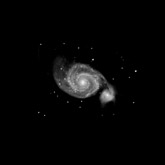
Capturing M51
M51 is one of the best galaxies to capture with the Meade Deep Sky Imager. It is larger and shows more detail than M63 and M94, yet it is small enough that it can fit comfortably in the DSI's field of view (unlike the Andromeda Galaxy or even M33). And of course, there are few galaxies that are more beautiful or more iconic.
I used my 8" Schmidt-Newtonian at f/4 for the image above. Use a focal reducer if you're using an f/10 Schmidt-Cassegrain. A small refractor will not yield the best results—M51 needs a good deal of magnification.
Finding M51 is very easy. Start at the tip of the Big Dipper's handle (η Ursa Majoris) and move south-west about four degrees. You will see M51 as two fuzzy stars in the DSI's live image. The larger fuzzy star is the nucleus of the galaxy; the smaller one is the center of M51's companion, NGC 5195.
I used the monochrome DSI Pro to capture this image, which meant that I needed to use RGB filters to capture the color. I shot 90 minutes with a clear filter (to get the luminance portion) and then 30 minutes for each color. Each frame was a 60-second exposure. For the luminance portion 60-seconds was probably long enough. More than that and I would have overexposed the sky (because of the light pollution around Cambridge). But shooting through a color filter makes everything fainter and so I should have used longer sub-exposures for the color portion.
Processing the Image
M51 is a pleasure to process. There is so much detail in the spiral arms that you can push the contrast and the sharpness pretty far and still get good results. But be careful when processing the faint outer glow around M51's companion—you don't want to enhance the noise. This is a perfect galaxy for practicing your isolated-zone enhancement techniques.
I started by stacking the luminance images using Penumbra (Figure A). One advantage of using Penumbra is that the black-point of each frame is normalized before stacking. This makes the edges of the image smoother and consequently gives me more open space around the target.
Next, I used Adobe Photoshop to stretch the histogram and bring out the galaxy (Figure B). At this point, I'm working on the entire image (not isolated zones). First I used a Levels command to set the black-point to black. Then I used a Curves command to stretch the histogram. Don't be too aggresive here or you will blow-out the nucleus.
After the Curves command, the sky brightens considerably, and you might begin to see a gradient in the sky. To handle that, I manually added a layer that compensated for the gradient (using the Gradient Tool in Photoshop). Don't worry if your correction is not perfect. At this step in the process we only want to correct gross uneveness.
90% of the galaxy's image comes out after those steps. It is always an amazing sight to see a beautiful spiral emerge from the murky grayness of the raw image.
In Figure C I sharpened the image. In this step it is very important to isolate specific zones of the galaxy. Use Layer Masks in Photoshop to sharpen only the brightest parts of the image. If you try to sharpen the whole image, you will introduce noise to the faint areas. In fact, in this step I often blur the faint parts of the image (to clean out the noise in the raw image).
Now you get to clean up the image some more. Use your judgement to enhance the parts of the image that can be enhanced more. For example, I darkened the sky more and brightened the fainter parts of the galaxy. This brought out some of the faint wisps around M51's companion (NGC 5195). As you can see from Figures D and E, the enhancements are not as dramatic, but they can help to make the image stand out more.

After processing the luminance frame it's time to process the RGB stack. Again I used Penumbra to stack the RGB exposures. Then I proceeded to enhance the color image in Photoshop. Your goal is to stretch the histogram without distorting the color too much.
I generally try to use the Levels command to set the black-point and white-point for each individual color. Then I use the Curves command to stretch the histogram for all colors. This usually reveals an imbalance in one of more colors, so I use the Levels command again on individual color channels to compensate.
Next I blur the areas of the color image that are faint and have a lot of color noise. As you can see from Figure F, only the center part of the galaxy is sharp.
In Figure G I combine the enhanced RGB image with the luminance image. Now you can begin to see the galaxy in all its glory. A few tweaks later (Figure H) and you are ready to display your work proudly.