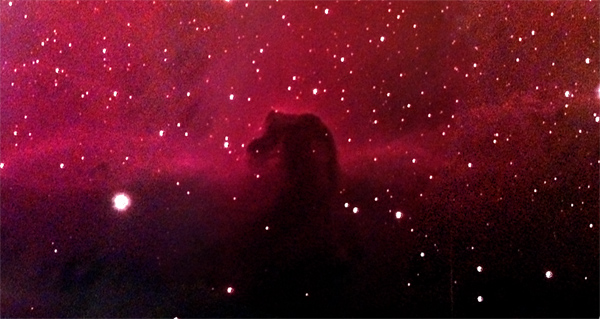
In some alternate timeline in which the descendants of horses, rather than of monkeys, evolved into telescope-wielding beings, perhaps fringe groups of conspiracy-lovers might look at this picture and believe that super-intelligent, alien horses created this stellar monument. Instead, in our timeline, conspiracy-lovers are more interested in a different picture.
There are actually two nebulae in this image. The darker, horsehead-shaped dust cloud (known as Barnard 33) is in front of a larger, luminous nebula (called IC 434). It is our perspective from Earth (and our imagination) that allows us see the silhouette of a horse.
Processing Technique
For bright objects like the Orion Nebula, I had no problems capturing the image as a Windows Bitmap and then manipulating it in Photoshop. For fainter objects, however, I need a greater dynamic range. Windows Bitmap files (BMPs) use a maximum of 8-bits (256 color values) to represent each primary color. The Deep Sky Imager, however, records 16-bits (65536 color values) for each primary color. When the DSI software generates the BMP, it scales those 65536 colors to fit into 256. For example, it might map colors 0-255 to the color 0 and 256-511 to the color 1. Needless to say, if the detail in your nebula is represented in colors 256-511, then you've just lost all your detail when you convert to BMP.
The histogram control in the DSI capture software controls how the 65536 colors are mapped to the 256 values of each BMP channel. Sliding the top of the histogram to the left throws away the top end of those 65536 colors and maps the remainder to the 256 values in the BMP. For example, if you put the top of the histogram at the midpoint (32000 or so) then the software will output a BMP in which the colors 0-127 are mapped to the value 0 and 128-255 are mapped to the value 1. This increases the detail of the darker areas and also makes the image brighter (since color 32000 is now mapped to 255 whereas before it was mapped to 128 or so).
But for really faint objects, the histogram mapping is too coarse and error-prone. A much better idea is to let the DSI output FITS files which keep the entire 65536-per channel range. My only problem is that I am much more familiar with Photoshop than I am with any other image-processing tool and Photoshop cannot read FITS files.
Fortunately, I was able to write a quick little program to convert from FITS files to TIFF files. TIFF files also support 16-bits per channel and Photoshop can open TIFF files. If you're interested you can download the program here. To use the program, simply open a FITS file generated by the DSI capture software and save it as a TIFF file. Right now the program only works for the FITS3P format generated by the software (which combines all three channels in one file). It will not handle the individual channel files.
Once I loaded the TIFF file into Photoshop, I used the following technique to stretch the histogram:
First, I sampled a point on the image that is supposed to be empty space (i.e., no stars or nebula). The more images you stack (I stacked 120 for the center of the Horsehead) the better this works. In my case, the point turned out to be RGB 37,21,23. Next I brought up Image/Adjust/Levels and I adjusted each color channel individually.
 For each channel, I set the low end of the histogram to the sampled RGB value minus four. For example, the sampled red value was 37, so I set the low end of the red channel histogram to 33. Then I set the high end of the histogram to the low end plus 15. Thus for the red channel I ended up setting the high level to 48.
I continued in this way for the green and blue channels. Since the sampled green color was 21, I set the low end to 17 (21 - 4) and the high end to 32 (17 + 15).
As long as you process each channel in the same way, you should preserve pretty good color fidelity. Note that the numbers -4 and +15 are arbitrary. You can choose different numbers and see what results you get. The important thing is to process each channel relative to the black space color that you sampled. You are essentially setting the black-point for the picture and adjusting each channel to conform.
Note: I'm using Adobe Photoshop version 6.0, which has only minimal support for 16-bit channels. Later versions of Photoshop should be better (including, I believe Adobe Photoshop Elements).