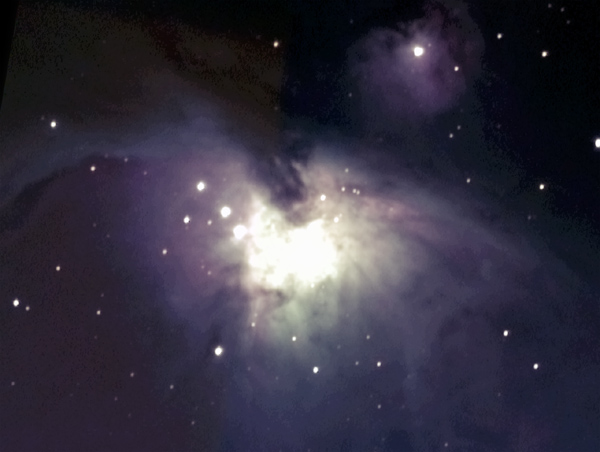
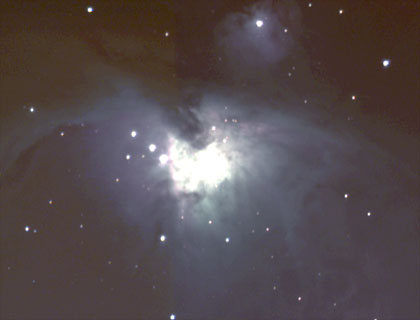
With the naked eye the Orion Nebula is visible as a fuzzy patch of light in the center of Orion's sword. The nebula is a young star-forming region only 1,600 light-years away. Entire star systems are being born here, and the light from the new-born stars illuminates the cocoon of gas that surrounds them and from which they formed. Perhaps our solar system was born in such a place.
The image above is a mosaic of two stacked images, each of 24 exposures of 15 seconds each. Orion was somewhat low in the horizon and transparency was below average. To capture the images I set the histogram in the AutoStar suite to 8,000 on the low-end (because there was substantial sky glow) and 40,000 on the high-end (to get more of the faint nebulosity). At 15 seconds, the high-end of the histogram was clipping (i.e., the central part of the nebula was overexposed).
Processing Technique
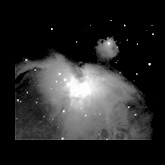
I used Adobe Photoshop to process the image. I first aligned the two stacked images. I loaded each image onto a separate layer and set the blending of the top layer to Difference. When the two layers are aligned, the area in common should be all black. Once the two layers were aligned, I switched the blending back to Normal. In this case, I also noticed that there were some color differences between the two images. I adjusted the color of one image as much as a I could to match the second. Then I erased the seam between them using the eraser tool and a wide brush. The end result looked like this:
Next, I use the Image/Adjust/Levels command to stretch the histogram. The histogram looked different for each channel, so I adjusted each channel separately. Take a look at the histogram:
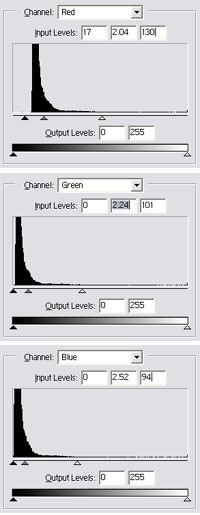 Notice that in the red channel the sharp peak doesn't start at 0 (i.e., it is not flush against the left edge of the scale). This means that there aren't too many pixels that are black. Even the darkest pixels are dark red instead of black. To compensate, I moved the bottom level (black triangle) to the left a little. I didn't set it all the way to the start of the peak because I figured that some of those pixels represent nebula and I don't want to set those to black.
Still in the red channel, I set the top level (white triangle) to just after where the pixels trail off. There are very few pixels to the right of that point, so very little information is lost.
Next, I moved the center level (gray triangle) just to the right of the peak. The end result is that the bulk of the pixels (around the peak) will be distributed across the entire dynamic range of the image (instead of crowded at the dark end of the spectrum).
I made similar adjustments to the green and blue channels. I set the bottom level to the left of the peak, the top level to the right of where the pixels trail off, and the center level to the right of the peak.
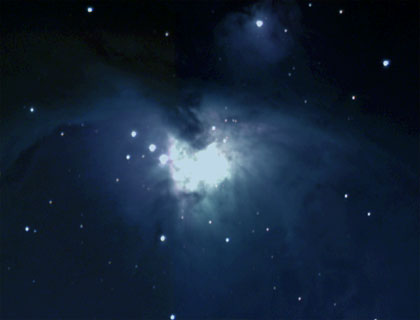
When I finished, the result was this:
Already, the image is showing drastic improvement. But note that the colors are different. Stretching the histogram separately for each channel maximizes the dynamic range of the image but does not preserve color. Of course, it is difficult to determine what the correct colors should be without knowing the response characteristics of the detector. Fortunately, since my goal is only to generate beautiful images, I can just adjust the colors by eye until I get a pleasing image.
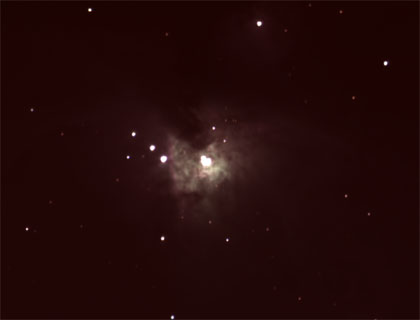
The next step is to subtract out the sky glow. That is slightly difficult for this object because so much of the image is covered by nebula. Which part is nebula and which part is sky glow? Knowing a bit about what the Orion Nebula is supposed to look like, and guessing that the darkest part of the image should be black, I settled on picking a sample in the upper-right corner for my sky glow.
I sampled a point in the upper-right corner. Next, I created a layer filled with that color. Finally, I used Image/Apply Image to subtract the color layer from the image. The result was this:
Remember that the subtraction makes every part of the image fainter. Thus, once again, our image is not using the full dynamic range. For example, the center of the nebula is no longer 100% white. It is now a tiny bit gray. The answer is to set the levels again. I used Image/Adjust/Levels to set the histogram again. Once again, I altered every channel separately. The final image looks like this:
From here to the final image is a matter of taste. You can use Image/Adjust/Curves to enhance the contrast. Or perhaps you can adjust the colors to match the pictures that Hubble took.